Today we’re going to talk about user-friendly routing for MVC widgets in Sitefinity 12.1.
In the past, if you wanted to filter a list of content by category or tags you would be required to put a tag or category widget onto the page.
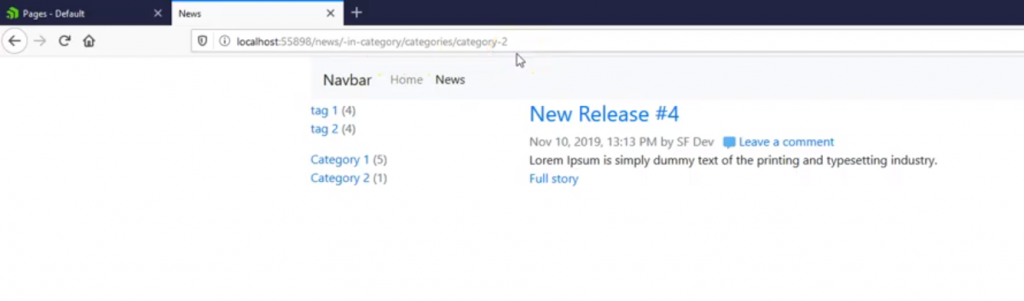
In this example, I have a category, tags, and News widget on this page. I have five news items tagged and categorized and only two news items can display per page.
When I click on a tag or category the list of News items will be filtered. If you look at the URL you can see that it uses a simple format to help display the specific categories of content. The problem with this model is you needed to have a tag or category widget on the page for the filtering to work.
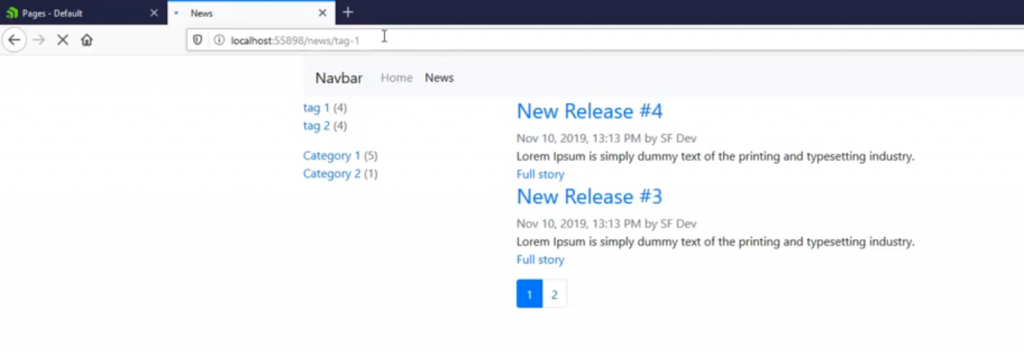
With the built-in user-friendly routing for MVC widgets, you can now just type the URL stub of the tag right after the page name and it will filter on that tag or category.
For example, if I type /tag-1 then I will only see the items that are tagged for tag 1.
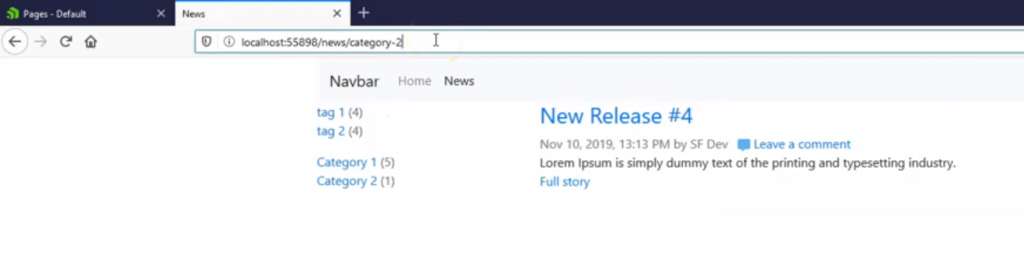
And if I type /category-2 then I will see all of the items for category 2.
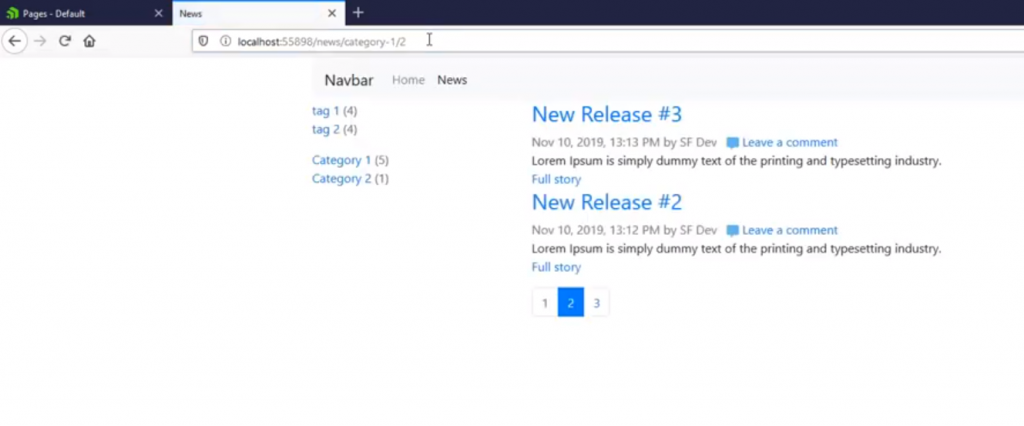
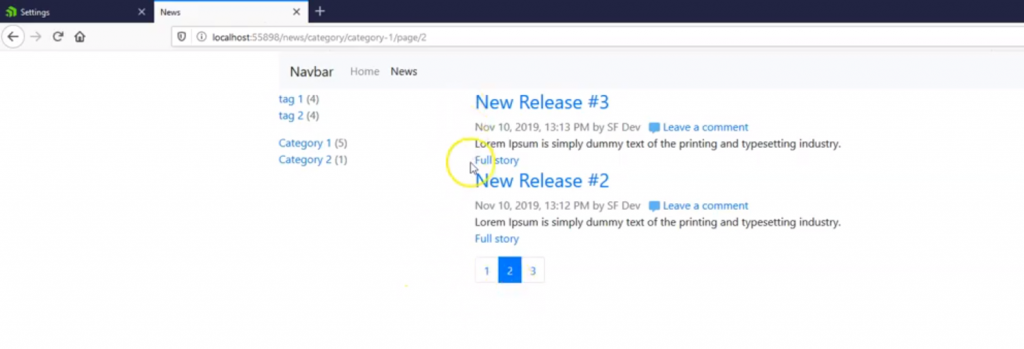
I also have the ability to add user-friendly routing with paging. For example, if I type /category-1 and then type /2 then this will show me the contents of news items in category 1 on page 2.
Now, this makes it really easy to quickly filter content based on tags and categories or even by paging. But what if you have a category that has the same name as a tag but you really want to filter by category and not the tag? This can be accomplished by enabling named URL parameters.
Enabling Name URL Parameters
STEP #1 To enable named URL parameters on the Sitefinity backend just go to administration and then settings.
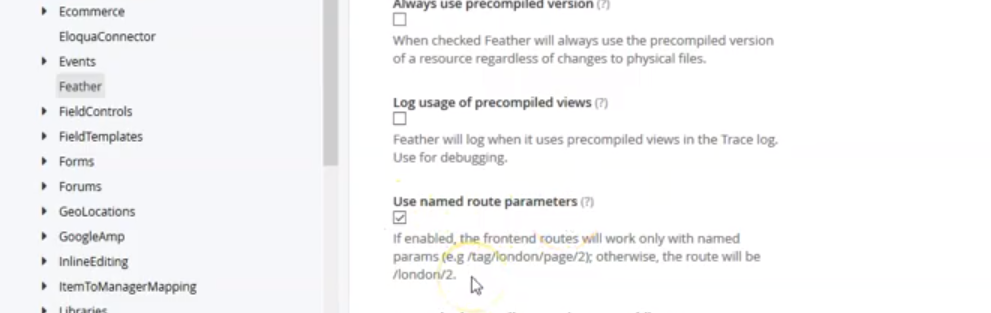
STEP #2 Then click on advanced and on the left-hand menu select Feather. Here you will then check the option use named route parameters.
STEP #3 With named URL parameters enabled you will be required to specify what you are filtering by before you type the tag or category URL stub.
For example, if you type “/category/category-1/page/2”, this will show you the second page of Category 1 new items similar to the previous example. This option can be more intuitive when you have a lot more tags and categories on your website.
Overall, user-friendly routing for MVC widgets can make it easier to filter by categories, tags, and paging without the use of a category or tag widget.
Today we’re going to talk about predefined values for MVC widgets.
In this next series of blog posts, I’m going to talk about all of the new features in Sitefinity 12.1. In today’s post, we’re going to talk about predefined values for widget properties and how to set them up.
Widgets provide functionality for the pages on a Sitefinity website. And they’re highly configurable through a set of properties. To edit these properties just click the edit button for a widget and then click the advanced button.
These widget properties make up the configuration for this widget. But what if you want to apply consistent settings across all of your widgets, how would you do that? Setting these properties can become very cumbersome. This is where predefined values for widget properties come in.
This technique can save you a lot of time. Predefined values for widgets can work for both web form and MVC widgets. You can also set predefined values for built-in widgets, dynamic module widgets, and even custom widgets.
So how do I use predefined values for widgets? Getting the value for a widget property is very simple.
Getting The Property Name
Let’s say for example we want to set the number of pages per page to 10 instead of the normal 20 when listing news releases. You can do this very easily by finding the property that you want to modify, In this example, the property we are looking for is “ItemsPerPage”. To set the default value for this property you will need to use dot notation. In this case, the property value that you want to override would be “Model.ItemsPerPage”.
The naming scheme for a property is simple to understand. Widgets at the root of the advanced properties window will just be the property name. If the property is under the “Model” section we would use the name “Model.”.
Add Property Name To The Toolbox Configuration
Now to set the defined property for the widget just go to the Sitefinity back end select administration, settings, advanced, toolboxes, page controls, sections, content toolbox section, tools, News_MVC, toolbox item parameters. Also, be aware that there are two versions of every widget, an MVC and Web Forms version.
Next, click the create a new button and set the key to “Model.ItemsPerPage”. Set the value to 10. Then click save changes.
Now when you add a new instance of that News MVC widget to a Sitefinity page the widget property, “Items Per Page” will have a new predefined value.
So now you’ve created a predefined value for a widget, And this is great because it will help to provide consistency for all of your widgets that are created going forward.
If you’re new to Sitefinity you’ll quickly learn that in order to use Sitefinity you’re going to need a license file. That license file determines what features can access inside of Sitefinity and what you can do.
To see what license file that you currently have installed just go to Administration > Version & Licensing. Here you can see the details of the license such as what edition of Sitefinity you’re running, the license type, the date of activation, and product version.
Further down, under the license detail section, you can see how many concurrent users can be logged into the Sitefinity back end, what extensions are enabled, and the valid domains.
What is a Sitefinity License File?
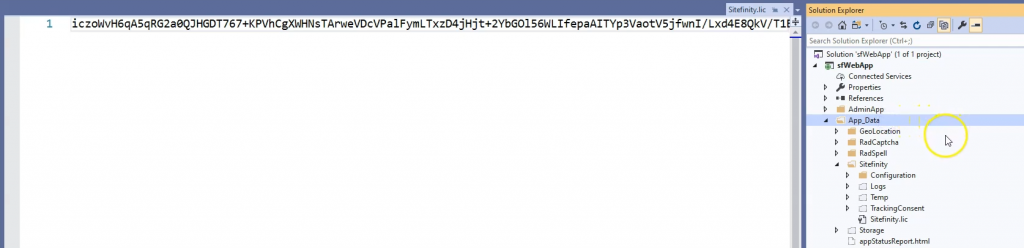
The actual license file is nothing more than just a plain old text file that’s stored within your Sitefinity project files. In this example, you can see that a Sitefinity license file is stored under the App_Data/Sitefinity folder.
If you open a Sitefinity license file you’ll see that it has an obfuscated view of the details. This one line of letters, numbers, and symbols contains everything that Sitefinity needs to enable access to modules, the number of users able to access the backend, and so on.
Image 1 – Contents of a Sitefinity License File
For learning purposes, I’m going to de-obfuscate this license file to show you how it is structured. Also, I want to put a disclaimer out here that I never recommend modifying or tampering with your Sitefinity license files.
De-Obfuscating the Sitefinity License File
In this de-obfuscated view of the Sitefinity license file and you can see that it’s just XML. This license file is using a secure envelope and it contains two sub-items called SignedInfo and SignatureValue.
The signed info contains the actual XML details of the license. We will look at this in more detail here in a second.
The signature value is generated from a private key and the contents of the signed info. Sitefinity can validate this license by running an algorithm against the signature value, the signed info, and the public key.
So if you modified the signed info and was able to obfuscate the license file again, it would not be considered a valid license anymore. You would need to generate a new signature value using the private key, and last I checked no one has the private key except the Sitefinity team.
Image 2 – De-obfuscated view of Sitefinity License File
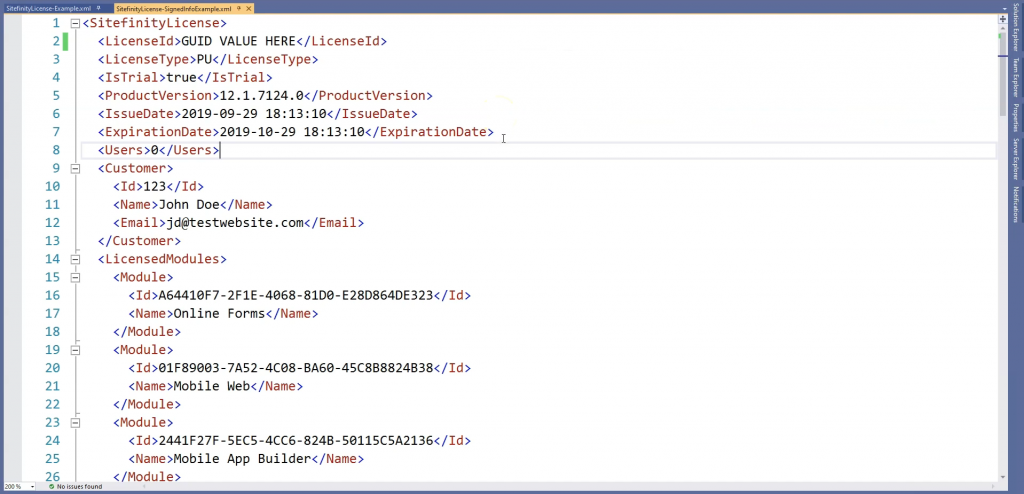
If we extract the signed info data you can see that it generates another set of XML. This XML details everything that you are licensed to access in a Sitefinity instance. In this example, you can see the type of license if it’s a trial license, the date the license was issued, the expiration date, the licensed modules, the license domains, and so on.
Image 3 – The Signed Info Section of the Sitefinity License File
There you have it, all those letters and numbers actually mean something.
One of the first problems that I had when I first started using Sitefinity was where do I download it? In this article I’m going to show you 3 places you can go to download Sitefinity for yourself.
#1 you can go to the Sitefinity website and download the bits from your account
On the Sitefinity home page just go to the login link and click Telerik your account. As long as you have a subscription to Sitefinity you should be able to go to the products and subscriptions menu and then select Sitefinity. Here you can download the Sitefinity project manager and any Sitefinity licenses that you currently subscribe too.
It is important to note here that you must have an active subscription to Sitefinity to do this option otherwise he won’t see any option here to download Sitefinity
#2 you can download the trial version of Sitefinity
To download the trial version of Sitefinity just go to sitefinity.com and then click on the try now button. You can also go to the URL found below to get to the same location on the web.
On the Sitefinity trial page, you can select to either click the Trial Download button or start an online sandbox. Go ahead and click trial download. If you just wanna see what Sitefinity is like and you don’t wanna mess with all of the technical aspects of Sitefinity then try the online sandbox.
Once you’re on the trial download page for Sitefinity just enter your personal details in click the download button.
You will then be able to download the Sitefinity trial executable. This trial executable will set up a local Sitefinity website on your PC along with a trial license for 30 days.
#3 you can download Sitefinity using NuGet
Using Visual Studio 2017 or 2019 you can create a Sitefinity project using a blank asp.net project.
1. First, in Visual Studio you will need to go to File > New Project.
2. Second, find the asp.net web application project template based on dot NET Framework and then click next.
3. Third, fill out the new asp.net project details. Make sure that the framework is set to dot NET Framework 4.7 point 2. Then click the create button.
4. Fourth, on the next page, you need to select the ASP.NET project template type. Select the empty template. It’s important that you don’t install any of the asp.net components here such as MVC or web forms as Sitefinity will do this for us. Then, click the Create button.
5. Fifth, on the Solution Explorer tab, right-click on the Solutions node and select Manage NuGet Packages for this Solution.
On the NugGet solutions tab, click the browse tab and search for Telerik.Sitefinity.All. If you don’t see the package, make sure to add http://nuget.sitefinity.com/nuget as a package source. Once you find the package Telerik.Sitefinity.All, select this it and set the version that you want to download and click install. In my case, I will download the latest stable version of Sitefinity, 12.1.7124.
Don’t forget you will need a license for this solution to work properly. If you don’t have a purchased license, you can also request a trial license as I described in option #2 of this video.
Overall, I think option #3 is the best because you have more control over where the solution is being created and also the ability to add it to source control easily.
Hey guys, welcome back. Today we’re going to talk about using Just Decompile, what is it and how to use it
If you’re new to Sitefinity and you’re wondering how that code was created behind the scenes then Just Decompile might be the answer for you. With Just Compile, we can take a .NET assembly or DLL and we can decompile it and see the actual code inside it because it can read the metadata of the IL or intermediate language, and then understand what it would look like in say, for example, C#.
So if you need to get this tool, just go to the link I provided below and I have a download link here that you can then click on and you can view and download this software for yourself.
Once you’ve installed the software, you’ll be able to right-click on any assembly and just open this assembly using Just Decompile. Once Just Decompile opens, you’ll then be able to access the code.
So, in this case, we’re looking at the Sitefinity forms module and you can see how it’s created here and this will give you a good idea of how this module was created.
There’s a lot to explore inside of here. You can see how the forms module was created. You can see all kinds of different things. For example, the comments module or the AB testing module, and you’ll start to get an understanding of how Sitefinity kind of works internally. There is a lot of code to Sitefinity, but if you’re looking for examples of how they built a module, you can probably find that here using the Just Decompile tools.
And like I said, sometimes documentation doesn’t provide enough information for you to be able to find what you’re looking for. Just Decompile can kind of lift the veil on some of the code and give you an idea of how things are working underneath the covers.
Hey guys, welcome back. Today we’re going to talk about MVC and why is important to the future of Sitefinity
An ASP.NET MVC Widget Example
In my last few videos, I’ve been talking about MVC and how it works with asp.net and this video, we’re going to look at how MVC applies to Sitefinity going forward. Sitefinity uses MVC and it really makes things a lot easier. If you look at this example here, I’m creating an entire widget using an MVC construct, so to create an NBC widget you literally use a controller, which I kind of demo in the last example.
So we have this example widget controller that I’ve created here that also inherits from the controller. But again, very simple to what we have seen for just an MVC concept. Here we have an action results index controller and that gets data and we return that to have you and that model data is using a model class of plain old class. Now we return that data to a view.
Now this set of files here was generated by a Sitefinity CLI and you can see what that looks like. Over here. On this MVC folder, we have a controller models, scripts, views, and we also have a shared folder which is very similar to what we had in a normal asp.net MVC website. So we look here, we have an index that’s the html file and that creates our view. There’s a few other files in here. This one called designer view. Simple creates our designer view or our edit view behind the widget and gives you a very simple way of modifying a widget properties.
An ASP.NET Web Forms Widget Example
Now let’s compare that to a Web Forms widget. A Web Forms widget looks a little bit different.
First you have this class rotator, which this is a simple news rotator that displays news articles in a rotating manner. Instead of implementing a controller, you’re implementing a simple view here and from there you’ll then implement the various properties that are needed for a simple view widget.
For example, here’s the default layout. And down here there are several other provided overrides that are displayed here, such as the provider name. If we scroll down a little bit further, we can see that we have overwritten this property called layout template name, which this allows us to see which template to load based on one of the provided templates here in the views folder. So there’s a lot of overrides and just different things like that that you have to do in a Web Forms template that an MVC template tends to just take care of for your next site. Sitefinity has now reclaimed that MVC is the preferred way of coding. This article that came out in May 31st of 2018 confirmed that going forward and Sitefinity 11 and beyond, everything in Sitefinity will be developed using an MVC web forms has kind of taken a back seat and going forward, even with the newer technologies such as asp.net core web forms, really won’t have a option there.
And so MVC really is the new route for all of this. And so I think that’s really gonna confirm it. So all new innovation going forward in Sitefinity will be done on MVC. One way to show this very clearly is in the forms module, so I’ve created two forms here, and Web Form and a web form and I’m going to show you the differences between these two. In this MVC form, we have the ability to add several more different tools from the toolbox here and on top of that there’s more options. For example, if I drag a text on here and I edit that text box field, you can see that we can set different values here. We can also define a template and we can also determine the type. For example, if we want it to be a telephone number field, we could do that in our web form control and you can see the layout a little bit different.
If I click on limitations, I don’t get a lot of choices here that I got in the MVC version of this same control. Another interesting thing about web form controls is that they don’t have the options to any kind of rules in their forms where the MVC forms allow you to do that. Now in version 12 of Sitefinity, I guess this pretty much demonstrates that going forward Sitefinity is now going to pursue MVC options versus web form options.
Hey guys, welcome back Craig from craig on code here. Today
we’re going to talk about three ways asp.net MVC can simplify your development.
#1 ASP.NET MVC Separates Concerns
In this example here we have an asp.net piece of code for a controller. And this controller worries about getting the data and displaying have you.
And this logic here doesn’t indicate what view I’m going to display or how I’m going to get the data, but it knows how to do that. So there is this separation of concern here. This repository pattern knows how to go get my data and if I wanted to change this to go pull from a database, I could easily do that. This view here easily allows me to pull in in display data. In fact, there’s an override for views to display a specific view if I wanted to.
So now I can easily display specific views of data by making logical decisions. Here in the controller in web forms, you have something called a dot ASP x page. And this page is tightly coupled to the actual HTML. So if I go to the HTML of this, you can see that this page is tightly coupled to a master page in is tightly coupled to code behind and to a class behind there.
If we go to the code page behind this, we can see that it renders a partial class two this underscore default class and inherits from the page, and then we have two events, page load, and then low data underscore click. So the functionality here is greatly tied to the functionality too. For example, this click button and they can’t be separated very easily, and on top of that, there’s a designer class that references to these different controls so that you can access them from your code-behind.
#2 ASP.NET MVC Is Easier To Test
Next, asp.net MVC makes it easier to test each component in a webforms scenario. It can be very hard to test a click event, but an asp.net MVC you can test almost anything. In this case, this action method right here can be tested by simply right-clicking and say, create a unit test. I can simply add this unit test to my MVC example tests.
I can assert for failure and hit okay and this will create a unit test here in my mic test project. If I go ahead and open that up, you can see that I can simply see the test here and I can invoke that method very easily from this standpoint. Now with web forms, it can be very difficult to create a test. If you right-click on this event, you could create a unit test off of this, but there is no output from this and the same goes with this low data click so that it’s not very easy to test this.
So in a lot of cases, in a web forms project, you’re going to test the business logic, but there’s really no way to test the UI logic in a web forms project without going through a lot of extra work. And finally, the HTML generated by an MVC application is way simpler than a web forms application.
#3 ASP.NET Produces Simpler Code
So if you’re a web application developer and you’re used to digging into the HTML, MVC is a lot easier to deal with. To prove that example. You can see this page here. This is the page that I displayed in my previous video displaying product information and if we look at the source of this page, it’s very simple. I have some metadata tags here, title tag, normal head, normal body stuff and what you’ll see here is that there’s nothing complicated here in a webforms scenario. You can see that we have this application here and I’ve created this data load button and this data load button produces this chart of prices. If I look at this source code for this page, you can see that first, we have, this is being done. A hidden section which has something like view stayed in it. Our MVC example didn’t have anything like this.
View state is how asp.net web forms keep’s track of all of these server controls and you state ends up becoming very bloated and very large in web forms applications. You also have this logic here for postbacks and things like that, so in general Web Forms tends to get more bloated, more HTML loaded. This last section really is just code that was written for the page, but you can see there are pieces of code that are written in an injected into this page for Web Forms application.
One other piece that is very interesting in a web forms application is that the whole body is wrapped in a form and that tends to be a problem for a lot of people because you have this form that’s wrapped in this entire body. You can’t inject another form inside of here, so then you get some weird scenarios where you’re trying to put another form inside of a form and you really can’t do that in an asp.net web forms scenario.
In this blog post I am going to show a concrete example of an ASP.NET MVC project using the MVC pattern. In my last blog post I introduced the concept of the MVC pattern. Click here to refer back to that post.
The Controller
We’re going to start with the controller. In this example here we have a home controller. Now very typical in an asp.net application, your controllers will end with this name controller. In this case, the home controller, and they will always inherit from the controller. And inside of this controller, we have one action method called index and it returns an action result. Now an action result returns some sort of view to the application and then displays that content. So the controller is just going to get data for us. In this example, we are getting a list of products, and then we’re taking that list of products and returning it to the view. So here we see the controller going out to the model to get data, and then we see the controller going out and pushing that data to the view.
The Model
So now let’s look at how the data is retrieved from the model. Our model class is just getting data for us. In fact, we don’t care how the data is retrieved for our model. We just know that the model class is going to get that. So in this case, I’m using a static repository class here called product repository. It has a method called get products. This will return a list of products for us. In this case, it’s just an in-memory list of products using this product class that has a name, price, and stock to it. It will new up some new products for us and return that to the products variable here in the controller.
The View
Now the product data is pushed into the view. You might be wondering where does this view exist and what view does it pull up?
Well, asp.net has this convention. In this case, here we are using the home controller with the index action. If you look at the views folder within an asp.net application, you’ll see that there is a home folder for the controller and then an index.cs HTML view. This view is what is rendered.
There are several different layouts that can be used in different folder configurations that asp.net will check, but by convention, this is the simplest setup, a views folder that contains the home folder for the home controller and an index CS HTML file that will be used for the index action. This index CS HTML file contains the template that is used to display the data. In this case, we’re setting the model at the top of the CS HTML file, our list of products.
We’re then setting up some HTML here, a simple table using some bootstrap and displaying this model data. This syntax is using something called Razor. This Razor syntax allows us to quickly display simple data onto a template like this.
The Layout Template
Now you might be thinking where is the rest of the page at? And that is actually determined over here in the layout.cshtml file. If we look at that, this contains our main layout and this render body is actually where our template data will be displayed. So think of this as, this is the main template and then our index data will be injected where that render body section is at.
Now, what determines that this _layout.cshtml file is used? If you go back to the underscore view start, the layout is actually set at this level here. And because it’s set at this higher level, it basically overrides the layout for this section.
Routing
So at this point, we now have a layout displaying our
data. But the question is, how did the home controller know to get called when
I went to a website URL? The answer to this question is routing. So routing is
this piece that sits in the background of asp.net MVC and it is determined by
this routeconfig.cs file. The route CS config file can be found in this
app_start folder routeconfig.cs. And this is all registered here within this
map route function. Here we’re setting the default route.
And if you notice here, the controller action and the ID make up a URL for the route. By default, if no controller is specified in the URL or no action is specified in the URL or no ID is specified, well we are going to use the home controller, which if you will remember, the home controller was the name of our controller and we’ll use the index action to start with. And if you’ll remember, our index action was our default one. There is a reason why we’ve named this home controller in index action because this will be the default index action method that is called to display the product data. So now if we actually run the site, you can see our application renders the model data here.
Now if we look at the URL, you can see that I’m running on localhost on port 62081. Now if I were to type in, home/index, you’ll see that I get the same page. And that’s because home for the home controller and index for the index action method are implied because of that default routing. So I can remove these and still get this home page.
Conclusion
That is a complete example of how the model view controller is used within asp.net. You have the controller, the model, which is this product repository, the view, and routing, which helps us kind of glue all this together and create a complete example of an asp.net MVC website.
Model, View, Controller, also known as MVC, is a software pattern used by developers to separate concerns between components. In a typical scenario you may want to separate the user interface code from the model data. This gives you many advantages such as removing tight dependencies between classes.
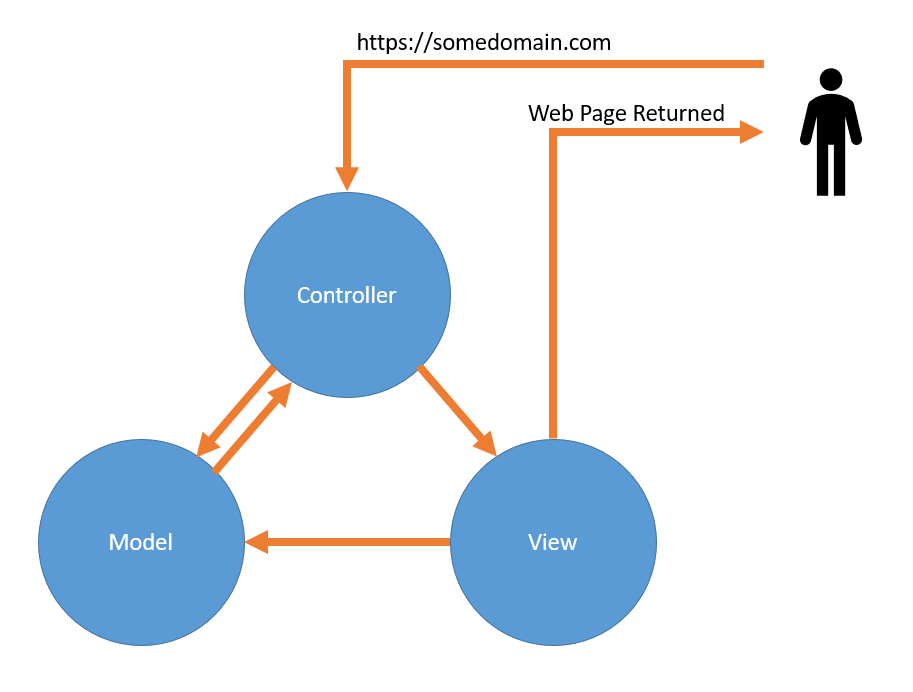
Below is an example of the MVC pattern with ASP.NET MVC. In a normal scenario, a web server will just return any static resource, but ASP.NET MVC sits in the middle of the request pipeline. This process uses logic, in the controller, to determine what data, the model, to send to the web page, the view. This gives you allot of control over what data is sent to the user.
Click here to check out all my content on ASP.NET.
The MVC Process
Below is a diagram that shows how this process would flow.
Model, View, Controller (MVC) Pattern
First, the user will request a web page in the form of a URL For example https://somedomain.com.
Second, the Controller will send a request to retrieve the Model data. This is typically in the form a database request using SQL or maybe even a request to a REST service. That Model data is then returned back to the Controller.
Third, the Controller will then send the Model data to the View. The Controller has the opportunity to determine what parts of the data it will send to the View and it also has the opportunity to determine what View it would like to return to the user.
Finally, the Model data and View will married together and returned to the user. Views are typically very simple and do not contain any business logic.
Ok, so now we understand the flow of this process, lets dig into each of these major components the MVC pattern.
The Controller
Think of the controller as the brains. Now, this might seem kind of odd, because normally when someone is requesting a webpage, they’re going straight to a webpage, and if there is any server side logic on the page, it will execute this logic before returning the web page. This process creates a tight coupling between the web page and logic.
What if I wanted to change the layout of the web page from some of my user and not of users? This task becomes very difficult as the code and web page are tightly coupled.
With a controller we can write logic to determine what data and what view is returned at execution time.
The Model
This model, or data, is pretty straight forward to understand. Model data is typically requested by the controller, not the view. The goal is to keep the Model and the View as two separate objects so that they remain independent of each other.
Let’s say, for example, we’re going to display a list of products. So our model may reach out to a database and query for a list of those products. Maybe the user is only able to view specific products, so our model will filter the products they are allowed to see.
Sometimes you may also see another pattern used here called the repository pattern, which is often used to separate our the logic of retrieving data.
Once all data is gathered, it is then sent back to the controller.
The View
Once the view receives the model data from the controller it can then display it, typically in the form of HTML. However, you can return other types of data. For example, the view can return data in XML or even JSON format depending on your needs. If have also seen examples of views returning data in CSV formats.
If you are returning HTML in your view, this is where the model data and view markup are married together. Views are meant to be simple and you should not be executing business logic here. That doesn’t mean you cannot have any logic here. So I normally follow this simple rule when creating my views. If the logic pertains to how content is displayed then it’s typically fine.
Separations of Concern in MVC
So I briefly talked about separation of concerns with the MVC pattern. But never answered the question why you might want to separate these components. Below are a few reasons why you would want follow the MVC pattern.
Frontend Designers Can Focus On The View
Frontend Designers typically understand technologies like HTML, CSS, and JavaScript. With this kind of separation, they will be able to focus on the design of the views without having to deal with how the data is retrieved from a database.
Backend Developers Can Focus On The Controller and Model Data
And on the flip side, if you’re a backend coder and you know how to deal with data, getting the data, storing it in a database and so on, then you can deal with the model and controller. A backend developer may be more familiar with technologies like C# or PHP and writing business logic.
Testing
This concept also makes testing easier. If I wanted to test the controller, then I would just need write tests against the controller.
If you have ever used ASP.NET Web Forms before, it had this concept of a code-behind page, and that code-behind page was linked to the HTML code, and that made a very tight coupling. This made it almost impossible to test the logic in this code behind page. And even worse, most developers would store all their business logic here making it impossible to test.
Conclusion
This is a very high-level view of the MVC pattern, and in a future post I will show you how to create the starter code for an ASP.NET MVC project using the MVC framework.